本文序
本文可利用系列文專用專案來一邊學習,快來安裝吧!
今天要進入測試程式碼語法的第一篇哩,接下來每天語法章節都會出個一題來讓大家練習,若還沒安裝專案的快去安裝!!!
describe & it 基礎用法
稍早有提到的測試情境與測試案例在 Vitest 工具中主要便是透過 describe 與 it(或 test) 來撰寫,而他們的用意除了規劃測試的脈絡之外,最主要是用來包裝斷言結果的資訊:
1 | import {describe, it} from 'vitest' |
假設在終端機執行上方的測試程式碼時,依據工具預設設定會在終端機顯示「錯誤的相關資訊」與「綜合結果」。
錯誤的相關資訊: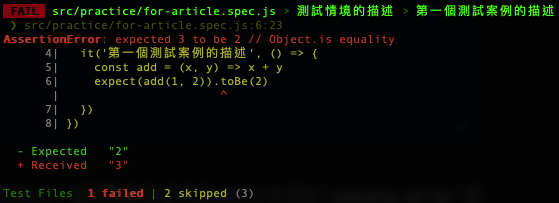
- FAIL:發生斷言錯誤檔案路徑 + 情境描述 + 案例描述(視當下錯誤所屬的情境與案例)
- AssertionError:發生斷言錯誤的原因,與發生錯誤的段落
- Expected:預期結果
- Received:實際結果
綜合結果: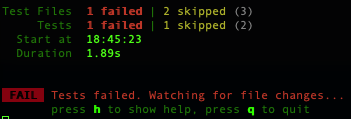
- Test Files:總共測試了幾隻測試檔案,並顯示成功、失敗與跳過的數量
- Tests:總共測了幾個測試案例,並顯示成功、失敗與跳過的數量
- Start:測試開始時間
- Duration:測試過程總共耗費時間
而除了上述基本用法之外,在同一個測試情境中也能容納數個測試案例。
1 | describe('測試情境的描述' , () => { |
甚至測試情境較為複雜的情況,測試情境(describe)也允許巢狀的方式來建構測試:
1 | describe('父層情境', () => { |
相反地,若在簡單的情境的之下,只有測試案例也是允許的方式之一:
1 | it('測試案例', () => { |
describe & it 輔助 API
除了上述的基本用法之外,透過 describe 與 it 撰寫測試的過程中也能透過輔助的 API 來整理測試程式碼:
.only:測試情境、測試案例皆可使用.skip:測試情境、測試案例皆可使用.todo:測試情境、測試案例皆可使用.fails:測試案例才能使用
only
若在測試情境用了此指令,則在同個測試檔案中只會執行帶有 .only 的測試情境,而其餘測試情境底下所有的測試案例將會被跳過(skipped):
1 | describe.only('測試情境 1', () => { /* */ }) |
若在測試案例中使用,則除了帶有 .only 之外的測試案例都將會被跳過:
1 | describe('測試情境 1', () => { |
skip
測試情境或測試案例被標注時,將自動跳過該範疇內的測試案例:
1 | describe.skip('測試情境 1', () => { |
todo
測試情境或測試案例被標注時,同樣將自動跳過該範疇內的測試案例,但 todo 含義比較接近待加入測試的區塊,並且將來若產出報告時也會特別整理出還有哪些地方需要補上測試。
fails
最後一個介紹的是測試案例才能使用的輔助 API,還記得列測試案例時的 sad path 嗎?當測試案例應該要失敗的時候就可以透過 fails 顯性標註他們:
1 | it.fails(`'1' + '1' should not to be '11'`, () => { |
當然你也可以單純藉由斷言中的 .not 達到同樣的效果:
1 | it(`'1' + '1' should not to be '11'`, () => { |
以上便是測試程式碼中測試情境與測試案例的部分,有關於輔助 API 的部分有些內容不一定會使用的到,若想更加瞭解所有可用的部分可以參考 Vitest 測試情境 與 測試案例 的文件囉。
除此之外,今日的練習題已經上傳至 系列文專用專案,一起來練習吧!